
How I created my editorial calendar and social media marketing tool with airtable and integromat

How I created my editorial calendar and social media marketing tool with Airtable and Integromat

Ever since I started blogging, I needed a way to manage my blogging schedule and I also realised I have to use social media for blog promotion. The problem is, I do not like spending time on social media. So, I needed a way to do it through automation.
After some research, I found out that there are some amazing apps, which I could use for all my blogging needs. Then I started to question what my needs were.
A good cloud based editor that I can access from all my devices
A place to keep all the relevant media files for reference and curate them over time
List of todos for my blog to be on my todoist
Calendar option to see what is coming out and when
Plan social media posts
Schedule them all
All of the above in one place seemed too much to ask at the time. But, there are apps that do it all. The only problem is that they charge too much. I mean, I’m not even earning from my blog yet, so I can’t really be paying in the range of $25 to $150 per month. So I had to come up with something that would work for me and work for cheap.
Airtable
The first app that came to my rescue was, as you might guess, (no not airtable) Notion. It is a lovely tool. It is like so many tools in one. But, they don’t have the api ready yet and that just sucks for what I was trying to do. So I tried airtable instead and it did not let me down.
It is quite easy to create tables in airtable and for this task that I was trying to accomplish, I just needed two of them.
“Post” table for all things blogging
“Social media” table for all things shared
Airtable gives us the ability to create table and view them as kanban boards, calendar views and I haven’t even started with the paid version to talk about blocks, which also looks quite promising.
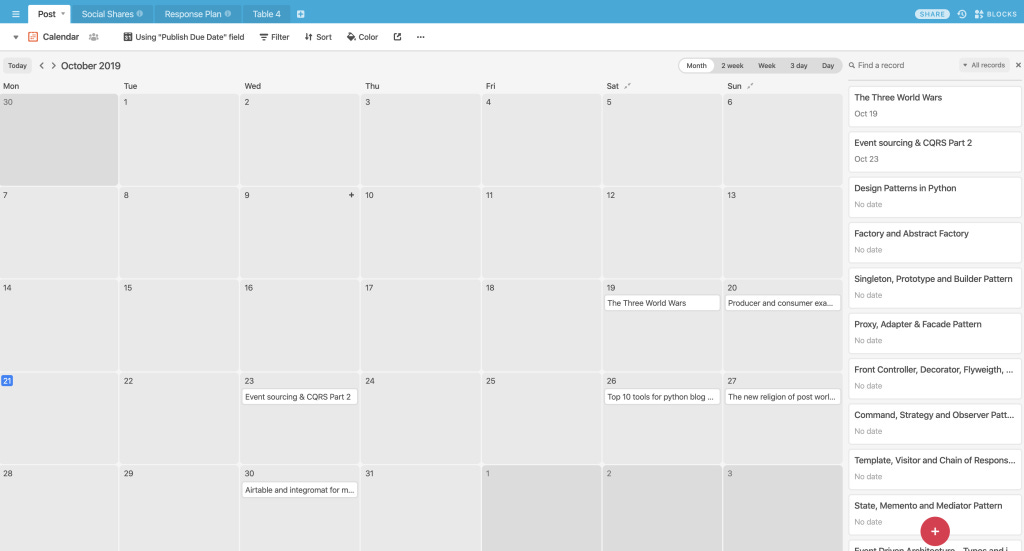
Calendar gives the view of all the scheduled posts and allows us to plan the upcoming posts. Since I’m using the free version, I can only see the schedule as per ‘publishing due date’. In paid version, we can see by multiple dates such as ‘draft due date’ and others if you’d like to add a few.

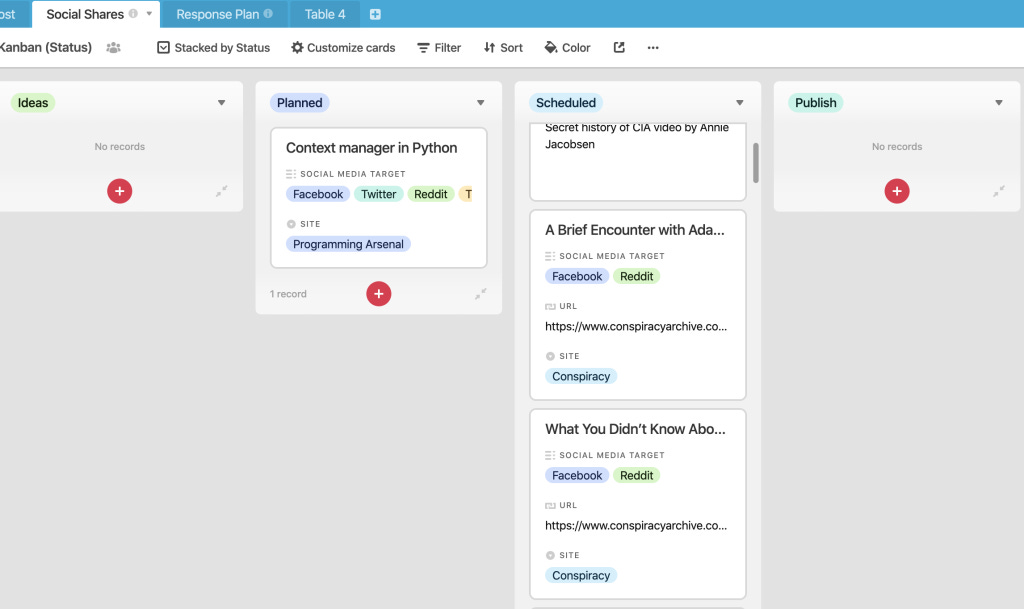
Kanban view is, of course, the most useful as it gives a proper view of what state the current posts are in. It helps to keep posts in progress to manageable count.
There are multiple status that allows me to keep track of what state the post is currently in.
Ideas: Where I collect all the ideas that I plan to post about.
Next: The ones that I have selected to start working on next. Pretty obvious, that one.
Research: To collect all the information related to the post on that card itself, so that they become easier to track. I also use Evernote notebooks to collect all the research in one place, if required.
Draft & Code: This is where the card is put when I’m actually writing the post. I prefer to use google docs for writing the post and a folder on google drive to collect all the media files that will be needed by the blog. Also, this is the point where I write the related code.
Media Generation: It is the point where I go about collecting all the media that I would need for the posts.
Review: After writing the post, code and set up media, then I move the card here. I use google docs share feature to share the blog to get feedback.
Updates Post Review: This is where all the feedback received during the review phase is covered and the post is updated.
Publish: Once we are done with all of the above steps, the post is pretty much ready to go out into the world. So, it is moved here and scheduled for publishing.
Share and republish: After publishing the post, there are other places where I would like to republish the post (LinkedIn, Medium and so on). It is also shared as a link on social media.
Done: After it is all published, republished and shared, the post is marked done.
That seems to be a long winding process to get things done. Currently, I’m thinking of merging 3, 4, 5, 6 and 7 into a single state as that is just too many steps. That is besides the point. The point being, we have a Kanban to move things along, easily.

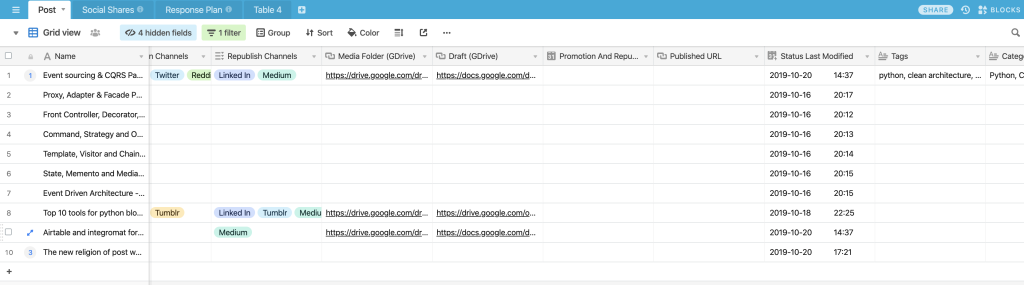
Each card represents a single post and hence, it needs to contain all the necessary information for that very post. Right from the draft and publish due date to the links to all the various tools that I’m using for the post.
As shown in the above image, their links to google drive media folder, google doc for post, channels where we would like to publish and social media channels where we want to share. There’s also Todoist task id that was created for this post and Evernote id for the research notebook.
We will look at how to fill much of these later. Right now, let us focus on only the values we set from Airtable itself.
Draft due date and Publish due date: these values are set when we move the card to next status
Blog Site: This is set as soon as the idea emerges, because it is related to which site the post is being written for.
Promotion channels and republish channels are also based on blog sites. Each site may or may not have a particular account associated on social media sites or other blogging platforms.
Headline: The name at the top is written when the card is created but an appropriate headline is selected later, which goes on the headline property of the card.
The other table is for social media and below is the Kanban view of social media posts.
Similar to the blog post, there is also a calendar view for social media posts. The only thing that I have yet to figure out is how to merge the two calendar views. One way I’m thinking of doing that is by syncing with google calendar, but that will have to wait.

Integromat
Next up is the integration platform. I tried using IFTTT, which is kind of not working half the time and Zapier what is just too expensive for a new blogger like me. Also, I already use the 5 zaps from Zapier for other personal stuff, for a long time now. So I needed something which was better than both. I found Integromat by searching for Zapier alternatives and I had no idea that it was going to be so useful.
Blogging Flow

Best thing about Integromat is that it doesn’t limit what apps you connect or how many nodes or apps are there in your workflow or even how big the airflow is. What they do restrict in free version is the amount of operations you can do, which happens to be merely 1000 per month. Although, I was wrong in thinking 1000 operations would be enough, but if I pay $10 then I get to run 10K operations.
This really isn’t that expensive, given what I am able to accomplish with that. But I’m still sticking with the free version, hoping to get them enough business that they decide to let me use their premium app for free. Looking at you Integromat!
Integration wasn’t so useful when it came to blog publishing because of the whole draft clean up and stuff like that. It turned out to be for social media publishing that I didn’t need to even look at Buffer, Crowdfire and definitely not Coschedule.
I think that these apps are very useful and they are amazing for what they do. But for a new blogger like me, where the money coming is none and things I need to do or try for experimentation are a lot, they were too expensive.
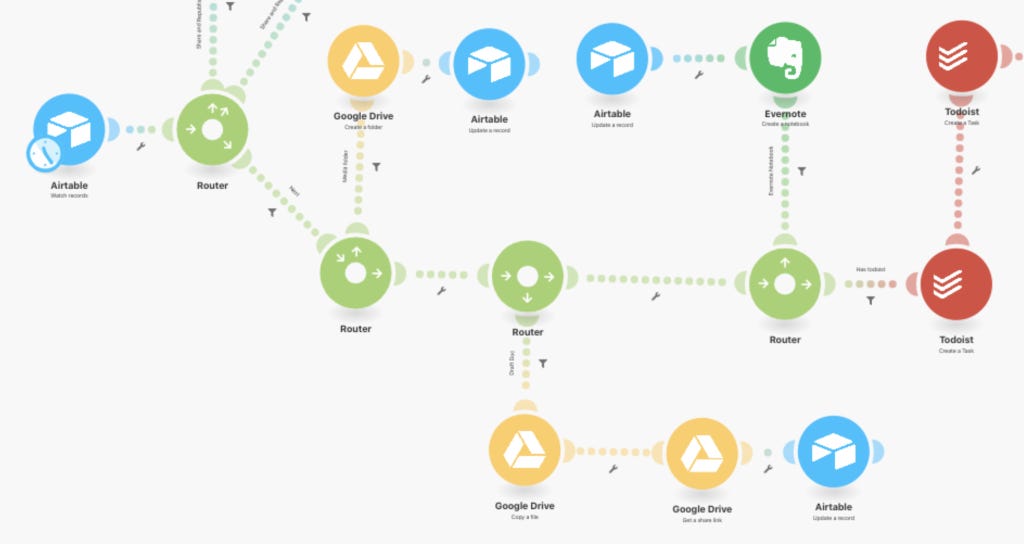
Whenever we move the blog post to the next status, the above workflow gets kicked off. It does the following:
It waits on any card to get the “Next” status and starts the workflow
It checks for draft link in the card and if not found, then creates the draft document and updates the link on the card.
Similarly, it looks for media folder link and updates by creating it, if not found.
Again, look for a Evernote notebook, create and update the card, if not found.
Finally, look for the Todoist id and create the task on Todoist and update the card, if not found.

Todoist tasks are created with top level task with the name of the blog and rest of subtasks with the steps involved in the creation of the entire flow. There’s also an iterator in the flow, to create a subtask for each of the platform where we should be republishing the post.

Finally, when the card is moved to the “Share and republish” status, we ensure that the published url is set. If not, then the card is moved back to the publish state. If the publish URL exists, then a new card on the social media table is created for this post. And the workflow for publishing to social media is initiated.

Social Media Workflow
Social media flow works a lot more independently from the blogging flow. Because it is quite easier to publish the posts automatically on the schedule than to publish blogs post. There’s a lot less editing involved.
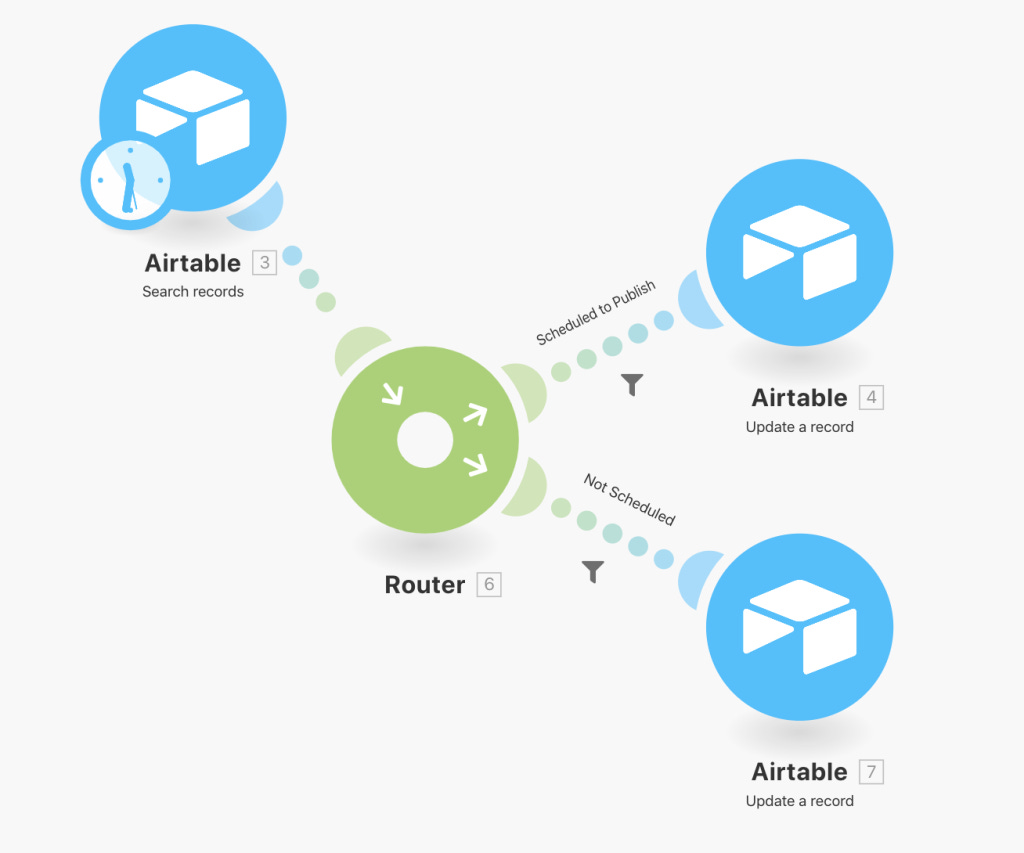
This one is rather easy. We add any new ideas to the “Ideas” status of the social media table. And the ones we are planning to schedule, we move to the “Planned” status with a fixed “publish due date”. The above diagram is for the flow that checks if the due date is not scheduled, in which case, we do nothing. But, if the date is set, then we simply move to the card to the “Scheduled” status.
Once the card is moved the the scheduled status, another workflow begins its interaction with the board.
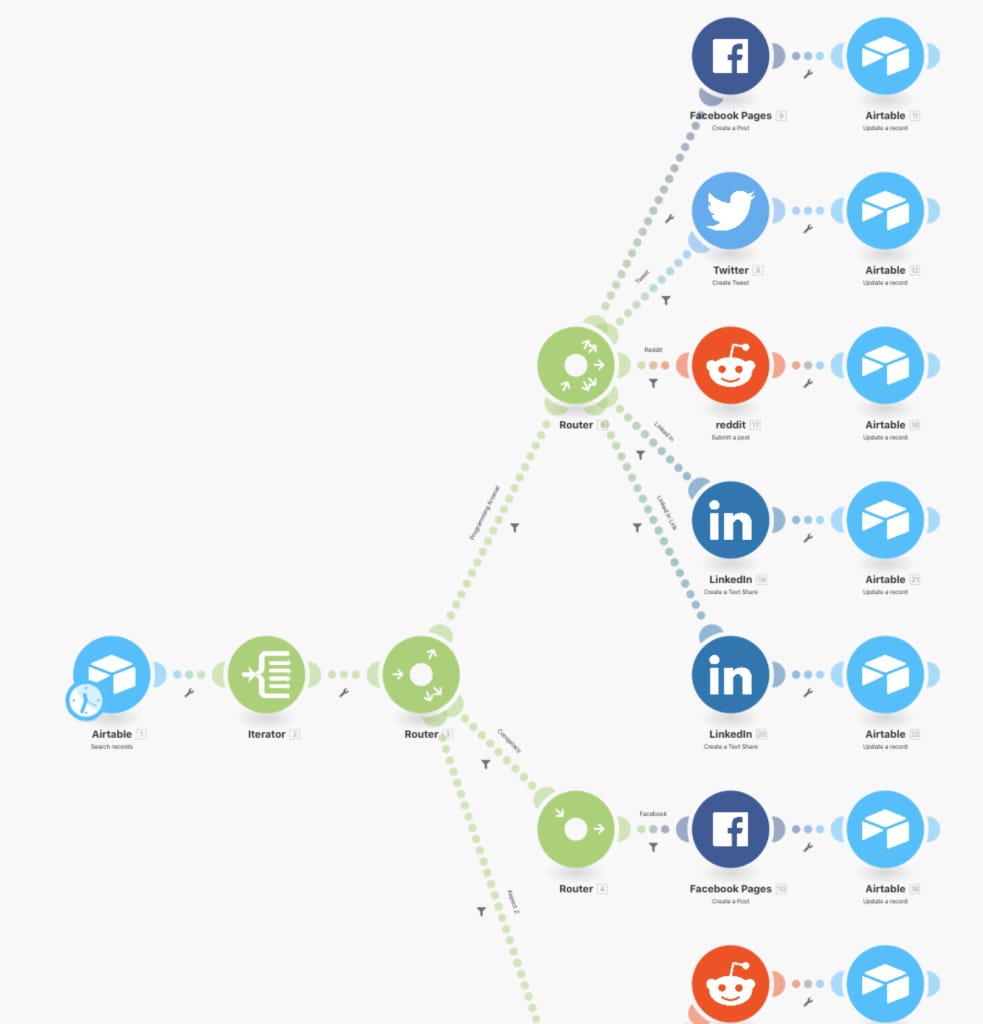
There’s an iterator operation that iterates over each of the social media platform that we want to publish and a router operator, which routes the flow to one of the various sub flows for each of the sites we have.
Once the filter selects the appropriate subflow for the site, then it is just a matter of checking the current value of iterator and selecting the path for that particular post. It posts and updates the social media card with tick marks after publishing.

That is about it. Although, the whole flow is not perfect, it does for me what a $10 per month app would do and does it for free. If I choose to spend $10 per month, then there’s a lot more I could do. For instance, update the card status when the Todoist item is checked and so on. I didn’t want to finish my monthly quota, so I stopped myself there. However, it is possible and it would be awesome to build.
A little rant and conclusion
Although, I was able to get this system to work for me and it has only been a few days, so I’m not sure how awesome this is and how much it will change over time. But, I’m glad we have something to start with and I only hope that it fulfills my requirements.
The whole operation limitation just sucks, especially when I lost most of those numbers when I was building the workflow through trial and error. Also, I hate the fact that all my tasks are not on the same board as well as on the same calendar.
I would much prefer to have it all on my google calendar. It took 3 days to get it right, after office hours, which is another reason why it would be a turn-off for non technically inclined as well as those with small patience for such things.
I’m just glad I have something rather than nothing and I am hoping that notion comes up with their api soon. Then, it would be so much easier to put all of these things in one place as notion actually is an amazing tool. Most of the apis will include using notion on all the nodes of the workflow and I can’t wait to see myself build that workflow.
I also think that if Notion does come up with an api and since there will not be need for anything other than todoist connection, then I might build that whole workflow myself and open source it, so anyone can run it on their local docker containers or any preferred location that can run docker service.
Also, I’ve come across this great tool, allowing you to generate images in bulk using Airtable. It’s called Abyssale.
Originally published at http://progarsenal.com on October 23, 2019.